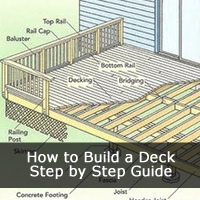
A deck you build yourself will give you years of enjoyment and the satisfaction of a job well done – unless it goes badly, and you have to hire a pro to fix it! That’s why it’s important to know what you’re doing. That’s the purpose of this guide.
Reviewing how to build a deck will also let you decide whether this is a project you’d prefer to leave to a deck company from the start, if you believe that’s the best path to the results you want.
This guide also includes common questions about deck construction and their answers, if you wish to also look at some of our Deck Design Ideas for your new deck.
Planning your Deck Project
Plan your work, and work your plan.
The Building Department in your city or county probably has a flier on decks with important information about Codes. It’s worth sticking to very closely to prevent problems when the deck is inspected. Even if the deck doesn’t require a permit or inspection, the information will prove valuable in building a safe deck.
How big should a deck be?
A deck that’s too large is a waste of money and has a little too much roominess. One that’s too small will be a constant frustration when entertaining. According to deck expert (dexpert?) Dennis Murphy, proper sizing for a deck is about 25 square feet per person. He says, “I feel decks should be roomy, not tight.” It’s outdoors, of course, so most would agree.
Twenty-five square feet per person will accommodate the people on the deck plus furnishings, a BBQ grill and one or more gear storage boxes that double as end tables. Any less room than that, and the deck will feel cluttered.
- 150-200 sq. ft.: 6-8 people
- 225-375 sq. ft.: 9-15 people
- 400 sq. ft. and up: 16+ people
If you’re throwing a party, and a lot of people are standing up or moving back and forth from the deck to the house or yard, doubling the number of people a deck can accommodate is about right.
How large does a yard have to be for a deck?
All the above is assuming your yard is large enough for the deck you want to build. If you have a small lot, you might have to alter your plans.
Also, and very importantly, be sure to check required setbacks in your neighborhood – how far off the property line any structures must be. You certainly don’t want the hassle and expense of modifying it when a nitpicking neighbor calls the city or county to make you move a deck that encroaches on the setback.
How hard is it to build a deck?
It depends. This is where your level of proficiency in DIY projects will influence the deck’s shape and more.
- Easy decks: Rectangular with planks running perpendicular to the joists. No stairs or one short set of stairs (up to 3 stairs).
- Moderately difficult decks: Rectangular with planks running diagonally or an L-shaped deck.
- Difficult decks: Elevated decks and those with multiple levels. Diagonal planks. Decks that wrap around a corner of the house or, even more challenging, around a hot tub or pool. Stairs that turn and/or have a landing. Built-in benches, perhaps with hinged bench seats so they can be raised for storage beneath. The more of these features a deck has, the more difficult it build it so that it looks like a pro did the work.
Sketch the deck: Real or digital graph paper is great for this. Use one or two squares per foot, and draw your deck’s outline, stairs, landings, etc. This allows you to calculate the square feet of decking you’ll need. For example, a 10×15 deck is 150 square feet. Add 10% for trim waste and the occasional bad board, so 150 + 10% = 165 square feet. Another route is to take your drawing to the lumber retailer, and they will help you put together an entire materials list.
Permit and site plan: Most communities require a permit for building a deck that is any of these: More than 200 square feet, 30” or higher off the ground, serves a required entry door or attached to the house. Contact your building department to learn the specifics for your community.
A permit allows for one or more inspections to be done to ensure the structure is built to code and is safe. Unfortunately, it also signals the assessor to raise your property value and taxes. A permit varies from $50 to $200 or more.
If your local government likes a high degree of control, a site plan might also be required. A site or plot plan shows your home, driveway, walkways and where the deck will be. Dimensions might be required to show the completed deck meets the setback rules.
A site plan can cost $1,000 or more when produced by an engineer or architect. There are online sites that specialize in professional site plans starting at about $100.

Deck Cost: Choose your Material
Cedar and treated pine account for the majority of decks, but they’re not your only option. This table shows deck costs for the most common deck materials.
Note that the substructure (beams, posts and joists) for most decks is made from wood, even if the decking is non-wood such as composite, PVC or aluminum.
The table covers all types of decks – Those that are low to the ground, so don’t require steps or guard rails, standard decks 2-3 feet off the ground, elevated decks and multi-tiered decks.
| Deck Material | Base materials price (1) | Base labor price (2) | Standard decks (3) | Elevated decks (4) |
Multi-level decks (5)
|
| Cedar | $3.85-$7.25 | $3.00-$5.85 | Add 2-5% | Add 7-12% | Add 10-20% |
| Treated pine | $4.75-$9.50 | $4.25-$6.75 | Add 2-5% | Add 7-12% | Add 10-20% |
| Composite | $6.50-$11.35 | $4.50-$7.55 | Add 2-5% | Add 8-15% | Add 12-25% |
| PVC/plastic | $7.25-$12.30 | $4.50-$7.60 | Add 2-5% | Add 8-15% | Add 12-25% |
| Redwood | $9.00-$11.75 | $4.35-$7.35 | Add 2-5% | Add 7-12% | Add 10-20% |
| Exotic wood | $6.75-$12.25 | $4.50-$7.00 | Add 2-5% | Add 8-15% | Add 12-25% |
| Aluminum | $12.50-$19.00 | $3.50-$6.50 | Add 2-5% | Add 8-15% | Add 12-25% |
Notes
(1) and (2): Base materials price and Base labor price are for decks low to the ground and resting
directly on piers.
(3): Standard decks are those 2-3 feet above ground.
(4): Elevated decks are typically those attached to the second story of a home or those attached
to a single-story home over a walk-out basement.
(5): Multi-level decks are built in many configurations including those attached to both first-floor and
second-floor of a home and those following elevations in the landscape.
How to Build a Deck?
The first job is to familiarize yourself with the International Residential Code for decks, which can be downloaded free of charge here from the American Wood Council. Most communities accept the IRC guidelines, though you might want to call your local building department to be sure.
Following its guidelines will ensure passing inspection if one is required per the guidelines given above. It contains important information such as spans (unsupported distances) for the most common building materials.
This summary from the North American Retail Hardware Association also has a lot of helpful diagrams and charts.
With preliminaries out of the way, it is time to get to work.
Table of Contents
Step 1: Gather your Materials
Step 2: Set your Blocks or Pour your Footings
Step 3: Attach the Ledger Board to the House
Step 4: Cut your Posts
Step 5: Attach Beams to the Posts
Step 6: Install the Joists on Top of the Beams
Step 7: Install the Decking
Step 8: Add Stairs to your Deck
Step 9: Install Deck Guards
Step 10: Stain and Seal your Wood Deck
Step 1: Gather your Materials
You’ve got great options for materials ranging in price from about $4 per square foot to nearly $20 per square foot. See the table above for deck material costs for the most popular deck materials. There’s more detail in our library of Deck Guides covering each material in the list.
Your list will include these items in quantities determined by the deck size:
Materials
- Primary deck material (cedar, pressure treated, composite, etc.)
- Beams, joists and posts
- Rail posts, top rails and balusters/spindles, if included (required on decks 30” or more above grade)
- Joist hangers
- Ledger board (and flashing, if it is attached to wood, but not if attached directly to concrete)
- Ledger screws
- Deck piers: 4×4 or 6×6 treated posts that sit on the piers or footings and support your deck
- Prefab concrete deck piers ($$) that keep your wood off the ground or enough bags of mix ($) to pour footings
- Fasteners appropriate for your deck material – screws, bolts & nuts, etc.
- Construction screws to secure the deck to your home, if applicable
- Weed barrier and gravel for beneath a non-elevated deck
- Weatherproofing Stain and Sealer
Tools
- 20’ aluminum tape measure ($) or 50’ wheel tape ($$)
- 48” to 72” level ($-$$$)
- Miter saw ($ to rent or $$ to buy for a homeowner-grade tool)
- Jig saw ($ to rent or $$ to buy)
- Impact driver ($ to rent or $$-$$$ to buy)
- Paint roller and tray
Step 2: Set your Blocks or Pour your Footings
Piers or footings must be placed every 5’ to 12’ in every direction depending on the strength of the deck joist material. This diagram from the NRHA gives an example, and the labeling of deck parts will be useful as we discuss how to build a deck below.
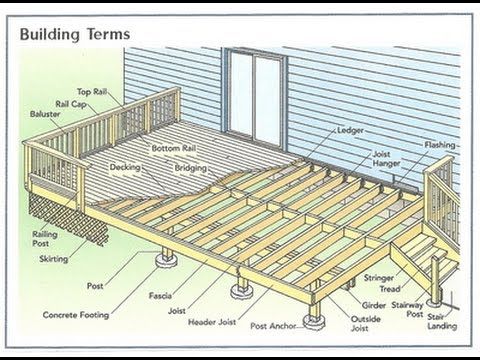
If your deck is low to the ground, setting piers or blocks on the ground and resting the deck on it makes sense. So, in the diagram, there would be no vertical beams. The joists would rest directly on the blocks.
To set the blocks, dig out turn and topsoil, and replace it with gravel. Set the deck blocks, and take pains to make sure their tops are level in all directions.
If the deck is more than a foot off the ground, you’ll need to dig footings from 2-6 feet deep. The goal is to dig below the frostline – the maximum depth to which the ground freezes. This will prevent your deck posts from being pushed up as the ground swells with frost, a process that will damage your deck significantly.
Pour footings at least 12” deep and 12” square or round. You don’t have to be careful about keeping footings level with one another. Depth is the issue here.
This map from the National Snow & Ice Data Center is a good guide for footing depth, though your local building department will have a specific depth and footing size requirements.
Step 3: Attach the Ledger Board to the House
If you’re building a deck away from the house, this step doesn’t apply.
What is a ledger board? The ledger board is the guiding board for the entire deck. It attaches to your home and runs the entire width of the deck. The joists attach to the ledger board to keep the deck firmly connected to your home, preventing its collapse.
The ledger board should be attached to the home so that when decking is installed atop the beams, the deck height is exactly where you want it to be. If your decking is 1.25” thick, install the ledger board1.25” below the desired deck height.
Attaching a deck ledger board: Use your level to mark every few feet where the ledger board top should be. Marking each end and using a chalk line to snap a line is also an option.
Use construction screws every 2 feet to temporarily hold the ledger to the house. More will be added, but you don’t want their heads to get in the way of joists or joist hangers.
Step 4: Cut your Posts
These posts will rest on the footings and support the beams that in turn will support the joists. Review the diagram above for clarification.
Should a deck be sloped: Contractors argue about this one. The consensus is that only watertight decks should slope away from the house, 1” to 2” per 12’. If you’re building a deck with planks that will allow water to drain through them, then it should be as level as you can make it.
Determining deck post height: Your posts should be the length required so that when the beams, joists and decking are installed, the deck is the right height. Measure the height from the footing surface to the height you want.
Subtract the width of the beam, joist and deck, and mark the beam to that length. Cut on the scrap side of the beam using a miter saw.
Follow this process to cut all the beams. Set each on top of its footing or pier, and backfill the footing with concrete or gravel if it is below grade. Once this is done, all their tops should be the same height.
Step 5: Attach Beams to the Posts
Depending on the deck material used and the distance the beam will span, two or three boards, side-by-side, are used for the beam. The weight of the beams MUST rest fully on the posts. That’s what the post is there to do – hold up your deck.
Measure and cut the beams. Set them in place on top of the posts and perpendicular to the ledger board. Use this opportunity to check level one more time. Adjust non-level beams by cutting the posts or shimming the beams where needed.
Use hangers to securely hold the beams in place on the top of the posts.
Step 6: Install the Joists on Top of the Beams
Code allows joists to extend 12” or more over the last beam. This is called a cantilever installation, and it gives you more deck room and hides the beam quite well.
Then length of your joists should be such that the last row of deck boards is full width. In other words, you don’t want to have to rip the last row length-wise, produce a row that is narrower than the other rows.
Start by installing the joists on each end of the deck. These, plus a joist that will be attached perpendicularly to the ends of the other joists, are called rim joists.
Attach a hanger bracket to the ledger board where each joist meets it using deck screws. Fit the joist in the bracket, and use deck screws to secure the joist to the hanger.
Now, secure the joist to the beam. Nail through the joist into the beam. This is called toenailing. We also recommend using joist clips, aka hurricane straps, that are metal brackets with a turn in them so that the lower end is flush with the beam and the upper end is flush with the joist. Secure the clips with screws (preferred) or nails.
Joist spacing for cedar and redwood is 16” on center, meaning the centers of the joists should be 16” apart. Southern pine can be set 24” apart, though 16” will give you more stability.
It’s likely the last joist will be less than 16” on center. Center it between the second-to-last joist and the rim joist. Once all the joists are in place, nail a finish board to the end of the joists to give it a completed look.
Now it’s time to add more construction screws to hold the ledger board to the house. Space them every 4” apart. The first should be in the center of the board, the second in the top third of the board, the third in the bottom third or the board, the fourth in the center and so on.
Step 7: Install the Decking
There’s a lot of work involved to get to this point, but now it starts to pay off. Use deck screws to attach the boards to the joists. Here are a couple tips.
If your deck is attached to your home and the plank boards will run parallel to it, start at the house, and work away from it.
If your boards will run diagonally at 45 degrees, the first boards should extend from corner to corner. Start so that a full board is in the center of the deck, with shorter pieces nearer the corners, if needed. Then, work on one side and then the other to complete the deck field.
Deck boards should be spaced ¼” apart to allow for drainage.
Stagger plank lengths to prevent joint butts from lining up on board runs next to one another.
Step 8: Add Stairs to your Deck
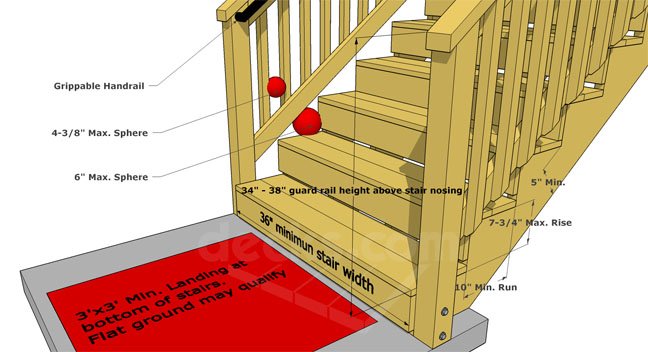
Stairs must meet Code, and the basics are captured in this diagram.
Does my deck need stairs? If the deck is more than 10” above grade, at least one step is required.
This diagram shared by the American Society of Home Inspectors shows deck stair basics.
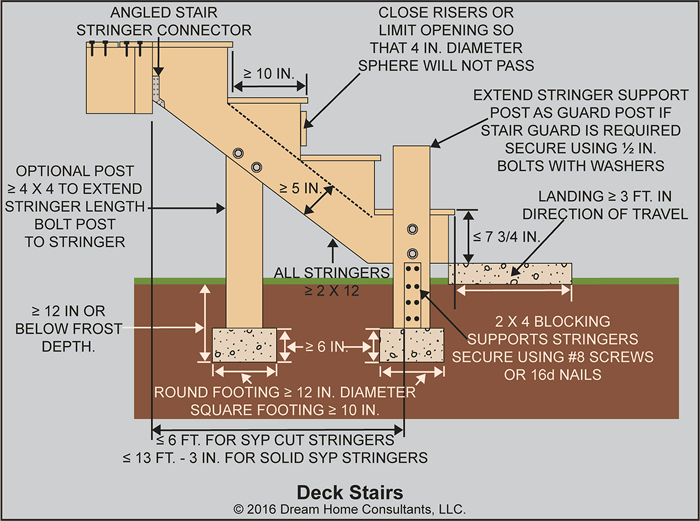
The Code for railings applies to steps too. Note also that a solid landing pad must be installed at the bottom, and it must be a minimum of 3’x3’. The best material for the stability and durability of the pad is poured concrete. Pavers and patio stones might be allowed in your community, but check with your building department if you want to use them.
Step 9: Install Deck Guards
Guards are the term used in the industry for railings.
Does my deck need a railing? If your deck is 30” high or less, no guard is needed, though you’re free to add one.
The diagram above (Step 8) shows the requirements for minimum guard height and maximum spacing of the balusters and steps. General construction of stairs is much like the rest of the deck, with footings and posts for stability.
It’s important to stick to the spacing shown here, since most inspectors are sticklers for it. The purpose of the spacing is to keep small children from fallen between the balusters. The maximum spacing also helps to give the guard the required strength.
Step 10: Stain and Seal your Wood Deck
This is for wood decks. The other deck materials can’t be stained and don’t require sealing.
If you use pressure-treated lumber, it’s recommended that you wait six months to allow it to dry before sealing the deck.
If you love the color of the wood you used, then sealer is all you need, then if you want to darken it with a different tone, then use a quality stain and sealer in one.
Most stains and sealers have a coverage of 225-400 square feet per gallon depending on how “thirsty” the wood is. Follow the directions on the can, and you should get excellent results.
Deck DIY or Deck Pro?
 All the best to you if you decide to follow our How to Build a Deck guide and build your own deck. This deck guide has pointed you in the right direction, and there are many good video tutorials online too.
If you’d like to get free estimates on a deck before making your decision, or if you’ve decided to hire a deck contractor, we can help. The service we partner with supplies no-cost, no-obligation estimates from some of the top deck contractors in your area.
They are prescreened for experience and to make sure they are licensed and insured. Again, there is no cost to this quick, convenient way to get free local deck estimates.